Thursday, August 6, 2009

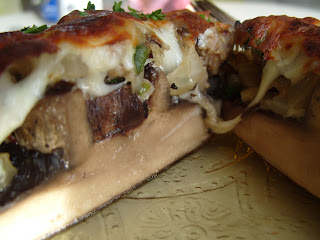
Multicultural Stuffed Portabello


If you're low-carbing it, and find yourself in the grips of a pizza desperation, this is a more than adequate alternative. It's pretty damn good no matter what you're dietary status is. You'll need:
  1. portabello mushroom caps- I recommend the biggest you can find
  2. 8 oz Italian sausage- I use turkey for calorie/fat sake, and I really can't tell the difference
  3. 1 small onion, chopped
  4. 3 cloves garlic, crushed*
  5. 1 poblano pepper, chopped*****
  6. mozarella cheese - here's where the extra calories are probably worth it. If you can't bring yourself to get the real stuff, at least avoid the super skim milk version.
  7. 1/4 c fresh parsley, chopped*
  8. cooking spray/olive oil
  9. salt and pepper

*****A word about poblano peppers: I'm a huge fan of the seasonings in Italian sausage, but poblano peppers have this incredible smokiness that I cannot get enough of. I do my best to weasle poblanos into every recipe I can, and this is no exception. It is, however, a somewhat tricky ingredient. First of all, I HIGHLY recommend using gloves if you're going to be slicing them open. Trust me. I've cooked some up, showered, dinner partied, then attempted to take out my contacts, only to end the evening in writhing agony, all Polyphemus-like. Second, there's a lot of variation in the strength of flavor in these guys. Sweetness, heat, flavor are never the same in poblanos, and I am not aware of a method to deduce this without tasting them. I say 1 poblano for this recipe, which is usually correct, but I recommend taking a taste test to see just how much you want to add.

On with the recipe.
Preheat the oven to 400, and start prepping the mushrooms. Cut the stems so they're equal in height to the walls of the mushroom, then with a spoon, carefully shell out the gills. Put all this byproduct in a medium-sized bowl- you'll use this for all the stuffing. Spray a glass pan with cooking spray, or brush it with olive oil, and put the mushroom top side down on the pan. Bake for 10 minutes, then flip them to stem side down and bake for another 5 minutes.

While this is happening, work on the stuffing. Brown the Italian sausage in a frying pan, breaking it up with your spatula. Once that's done, scoop it out of the pan and onto a papertowl to absorb some of the grease. I use the grease left in the pan to fry up the onion, garlic, and poblanos, but feel free to drain it off if it seems like too much (especially if you're using non-turkey sausage). Fry the veggies until they're tender and the poblano tastes more sweet than hot. Add a little salt and pepper to taste. Now put all the veggies, the cooked meat, and parsley into your bowl previously designated as the stuffing container. Add about 1/4 c mozzarella cheese. Mix everything up, then stuff it into your cooked mushrooms. Fit as much as you can, packing down if necessary. You'll probably have a lot leftover, but this stuffing makes a KILLER omelette the next morning. Top each mushroom with a thick coat of cheese, I'll say about 1/4 cup each. Put everything back in the oven for another 5 minutes, then flip it over to broil. Broil your meal for a few minutes until you see that golden-brown color. I like mine pretty crispy...

Tuesday, August 4, 2009

A Soapbox Entry: Salt


Salt was an epiphany for me. It's probably the most integral ingredient in any kitchen in any nation in the world, and yet I used to casually leave it out of my recipes thinking I was "cutting back on my sodium intake." This entry is not meant to debunk any myth about how bad high sodium diets are for you- 150 hours of studying for a cardiovascular exam have taught me quite the opposite. I would, however, like to point out one misconception that has given salt a bad rap. This adorable little graphic from The Mayo Clinic illustrates nicely where our high sodium intake comes from:


The point I'm trying to make is that if you're consuming too much sodium, it's not from the extra dash here and there in your cooking, and if you're cooking with real, natural ingredients, then you're probably not getting too much sodium.

That being said, allow me to elaborate on how wonderful salt is. There's a reason that nearly every recipe, from casserole to curry to cookies calls for salt. You do not add salt to foods to make them taste like salt. In fact, you shouldn't taste "salt" at all. The point of this magic ingredient is to crystallize the flavors- to make them bold, independent, and sparkly. Once I got over my society-bred salt phobia and started adding salt to my food, I began to realize its true power. Adding salt just turns up the volume on whatever it is you're cooking. The draw back, of course, is that once you've added too much salt, it's almost impossible to go back. It's a critical ingredient, but you walk a very fine line, hence the irreplaceable importance of the taste test. If you've been hesitant, just try it out, in small doses. There's a reason an entire portion of your tongue is devoted to this flavor.

Sunday, August 2, 2009

Exam Week Staples: Mushroom Chicken Soup


It may not look like much, but this soup has gotten me through some long, dark, unbelievably boring days, when my culinary repertoire is limited by time and attention span, with the possible exception of my caffeine source. I find myself making it nearly every exam for several reasons: 1. I can make a huge batch at once, 2. It's reasonably healthy and hearty (when compared to some of my other test week staples, namely coffee and string cheese), and 3. I almost always have the ingredients I need stashed away. Here's what you'll need:
  1. a container of mushrooms, sliced
  2. 1 medium onion, chopped
  3. a few cloves of garlic, chopped*
  4. 1 1/2 cups chicken stock - I just reconstitute mine from the bouillion cubes so I don't have to worry about keeping cans of stock... uh... in stock. Yup. Obvious pun resisted! Congratulate me!
  5. 1/2 cup cooking sherry
  6. a TB or so of olive oil
  7. 1 cup chopped up, cooked chicken -either leftovers, or I buy bags of pre-cooked chicken that you can keep in the freezer. They're always really tender.
  8. 1 cup broken up cauliflower, steamed - again, frozen is the way to go. Just pop it in the microwave and you don't have to worry about cooking it.
  9. a couple shakes of dried basil*
  10. 1 bay leaf*
  11. 1/4 cup cream*
  12. salt and pepper, naturally

*I've always had a habit of skipping ingredients in recipes when I was either too cheap or too lazy to purchase them. Sometimes this works out fine, and sometimes it ruins the whole thing, so from now on, I'll always * ingredients that are not absolutely necessary.

Now that all this is in list format, and I'm not just haphazardly tossing stuff in a pot, this seems like a lot of stuff, but it's all stuff that I always seem to have in my kitchen.

If you're going the bouillion route, go ahead and reconstitute a cube according to the instructions so you'll have it ready. Next, fry up the onions, garlic, and mushrooms in a little olive oil on medium-high heat until everything's tender. Put these cooked veggies into a blender along with the chicken stock (the cubes usually make more liquid than you actually need) and sherry. You may have to do this in batches. Go ahead and play with the amounts of liquid you add, depending on how thick you want your soup to be. Use your nose to guide how much sherry you should add- it's probably a better guide than my crappy estimate. And don't worry about adding too much- you'll have a chance to cook off that alcohol taste a bit later on. Now pulverize this mixture until it's absolutely creamy. This might take a few minutes. Add the cream, basil, and salt and pepper, then pour the mixture into a saucepan along with the bay leaf and set it on medium heat, stirring occasionally. If you're using frozen cauliflower and chicken, go ahead and thaw it in the microwave, then put it in the pot with the rest of the soup. Take your time here to play with the flavors until you've got it how you want it. If you taste too much sherry, just let it cook off. That's the best part about soup- you've got tons of flexibility with the subtle flavors, so you can make it just right. This will make about 4 filling bowls, and it reheats perfectly.

Saturday, August 1, 2009

Low Carb Blueberry Cheesecake


Somehow I'm allowed to eat this and call it dieting. Would I serve this to my too-skinny-to-diet circle of friends and try to pass it off as a legit cheesecake? Probably not. I could do better. Would I serve this to a hypothetical obese, diabetic friend? Probably not. They would eat the whole thing in one sitting. To someone abstaining from sugar for over a month, this is quite the indulgence.

Preheat your oven to 325 and set out 2 blocks of cream cheese so they can reach room temperature by the time you need them. This will make your life a lot easier.

Now take about 4 oz of crushed up pecans and mix them with a 1/2 stick of butter and 1 TB of imitation sugar. Spread this inside your pie pan, covering the bottom evenly. Set that aside.

Using a mixer, blend:
  1. 2 blocks of cream cheese
  2. about a TB of vanilla (I used clear vanilla so your cheesecake looks pretty)
  3. imitation sugar to taste (I used about 1 cup, I think. It depends on how sweet you like your cheesecake)
  4. 2 eggs, added one at a time
  5. Next time I make this, I'll probably add a little lemon peel as well, which I think would add a little zing.

Blend until smooth- if your cream cheese isn't at room temperature, this will be difficult. Finally, fold in about a pint of blueberries. I left a handful in the container to use as garnishes. I broke up the blueberries a little bit with my spoon just to get some pretty blueberry juice swirl in the cheesecake. Place in the oven for 30-35 minutes.

While your cheesecake is baking, make the sour cream topping, which is just:

  1. 1/2 cup sour cream
  2. another tsp of vanilla
  3. about 1/4 of imitation sugar

After your cheesecake has baked for 30-35 minutes, pull it out and spread the sour cream topping on, then put it back in the oven for another 7 minutes. Let the cheesecake cool in the fridge before you binge eat the whole thing.

Friday, July 31, 2009

Heavenly Sole and Damn Good Broccoli


Heavenly Sole

I'll bite it off with one of my Mama's famous recipes. I feel good about myself when I get my fish from the local "fresh off the boat" fishery on Harborside, plus it tastes good and is super cheap. This recipe is really fast, almost impossible to screw up, and will make people who don't like fish beg for more. Really, any white fish will do, but I'd recommend thinner fillets.

I'll give amounts for 2 fillets, which should feed 2...

Squirt some fresh lemon on a couple fillets of fish, sprinkle some salt and pepper as you wish, and let it sit for 15 minutes. Then broil it in the oven until it flakes... 10 minutes or so. In the meantime, mix together:

  1. 1/2 cup of mayonnaise
  2. 1/2 cup parmesan cheese
  3. 1/4 cup chopped green onions
  4. a couple drops of your favorite hot sauce to taste
  5. more salt and pepper, if you feel like it.

When the fish is flaky, pull it out of the oven and just smother it with this mixture. Really. It might seem like you've got way too much, but you don't. Use it all. Glob it on, and you'll still wish you had just a bit more. Put the fish back in the oven for another 2 minutes or so, until the sauce is starting to get that pretty brown color.


Damn Good Broccoli

Now for the side, and not just any side. 3 entirely seperate people have mentioned this recipe to me, claiming it's the best broccoli they've had in their life. For some insane reason, I only just now made it for myself, and probably won't stop making it. Ever. I put this second, but you should get started on it first- it takes longer, and can stand to be reheated while the fish is broiling, if necessary.

You'll want 3-4 heads of broccoli. This is more than enough for 2 people, but you'll want leftovers. The only tricky thing is that it's critical that you make sure the broccoli's dry. Completely. Preheat your oven to 425.

On a cookie sheet, toss the broccoli with olive oil, salt, and pepper, and 4-5 sliced cloves of garlic until it's good and covered. Oven it up for 35-45 minutes until the broccoli's starting to brown.

Diversion: I once saw on Alton Brown that when you crush garlic, you release enzymes that stimulate the creation of the burn associated with garlic. If you don't crush it, the flavor is more sweet. For this recipe, I'd say slice, don't crush.

Once you take out the broccoli, toss it with a few more ingredients:

  1. another tablespoon or so of olive oil
  2. the zest and juice of 1 lemon
  3. 1/3 cup of parmesan cheese
  4. some chopped basil*
  5. toasted pine nuts*

*4 and 5 are definitly optional... if you really want to treat yourself. But if you're cheap and start making this broccoli every other night for dinner, they can be cut.

Lustful.

Friday, July 24, 2009

Bear with me.

Allow me to express in this introduction what my otherwise useless humanities degree taught me to consider when beginning such a thing.

1. My intention: to stop my new-found habit of polluting facebook with pictures of food via a superficial translocation.

2. My audience: Me, the first time I made any of these recipes. Allow me to break dogma and apologize now for what may seem like condescension, but I'm really a dumbass, and it takes me a couple tries to get most recipes right.

3. Thesis (naturally): Here's some stuff I cooked, and I thought it tasted good, so I want to spread the word.

4. A caveat: Ok, I admit, I'm going through a low-carb phase right now, so my meals will reflect that. It doesn't change the way I cook all that much, but it might explain some ridiculous ingredient substitutions and omissions of a starch component.

5. A second caveat: I'm so damn lazy. I hate measuring stuff, so most of these recipes will include phrases like, "season to taste", "whatever seems right", "eyeball that shit."

I feel better now.